
🎉 重要:インストール不要のアプリをご利用ください! 🎉 Important: Use Our No-Installation App!
このページの手動インストール作業は不要になりました! The manual installation described on this page is no longer necessary!
会員の方は、複雑なインストール作業なしで、Chrome拡張機能と連携するyt-dlp Runnerアプリをご利用いただけます。技術的な知識は一切不要で、拡張機能で生成されたコマンドをアプリで簡単に実行できます。 Members can use our yt-dlp Runner app that works with the Chrome extension without any complex installation. No technical knowledge required - simply run commands generated by the extension in the app.
今すぐyt-dlp Runnerを使用する → Use yt-dlp Runner Now →※ 以下の手動インストール手順は、アプリを使用せずに自分でyt-dlpをインストールしたい方のみご覧ください。 * The manual installation instructions below are only for those who prefer to install yt-dlp themselves without using our app.
手動インストールを選択される方へ For Those Choosing Manual Installation
yt-dlp Runnerアプリを使用せず、手動でyt-dlpをインストールする場合は、以下の手順に従ってください: If you choose not to use the yt-dlp Runner app and prefer manual installation, please follow these steps:
- まだChrome拡張機能をインストールしていない場合は、こちらからインストールしてください。 If you haven't installed the Chrome extension yet, please install it here.
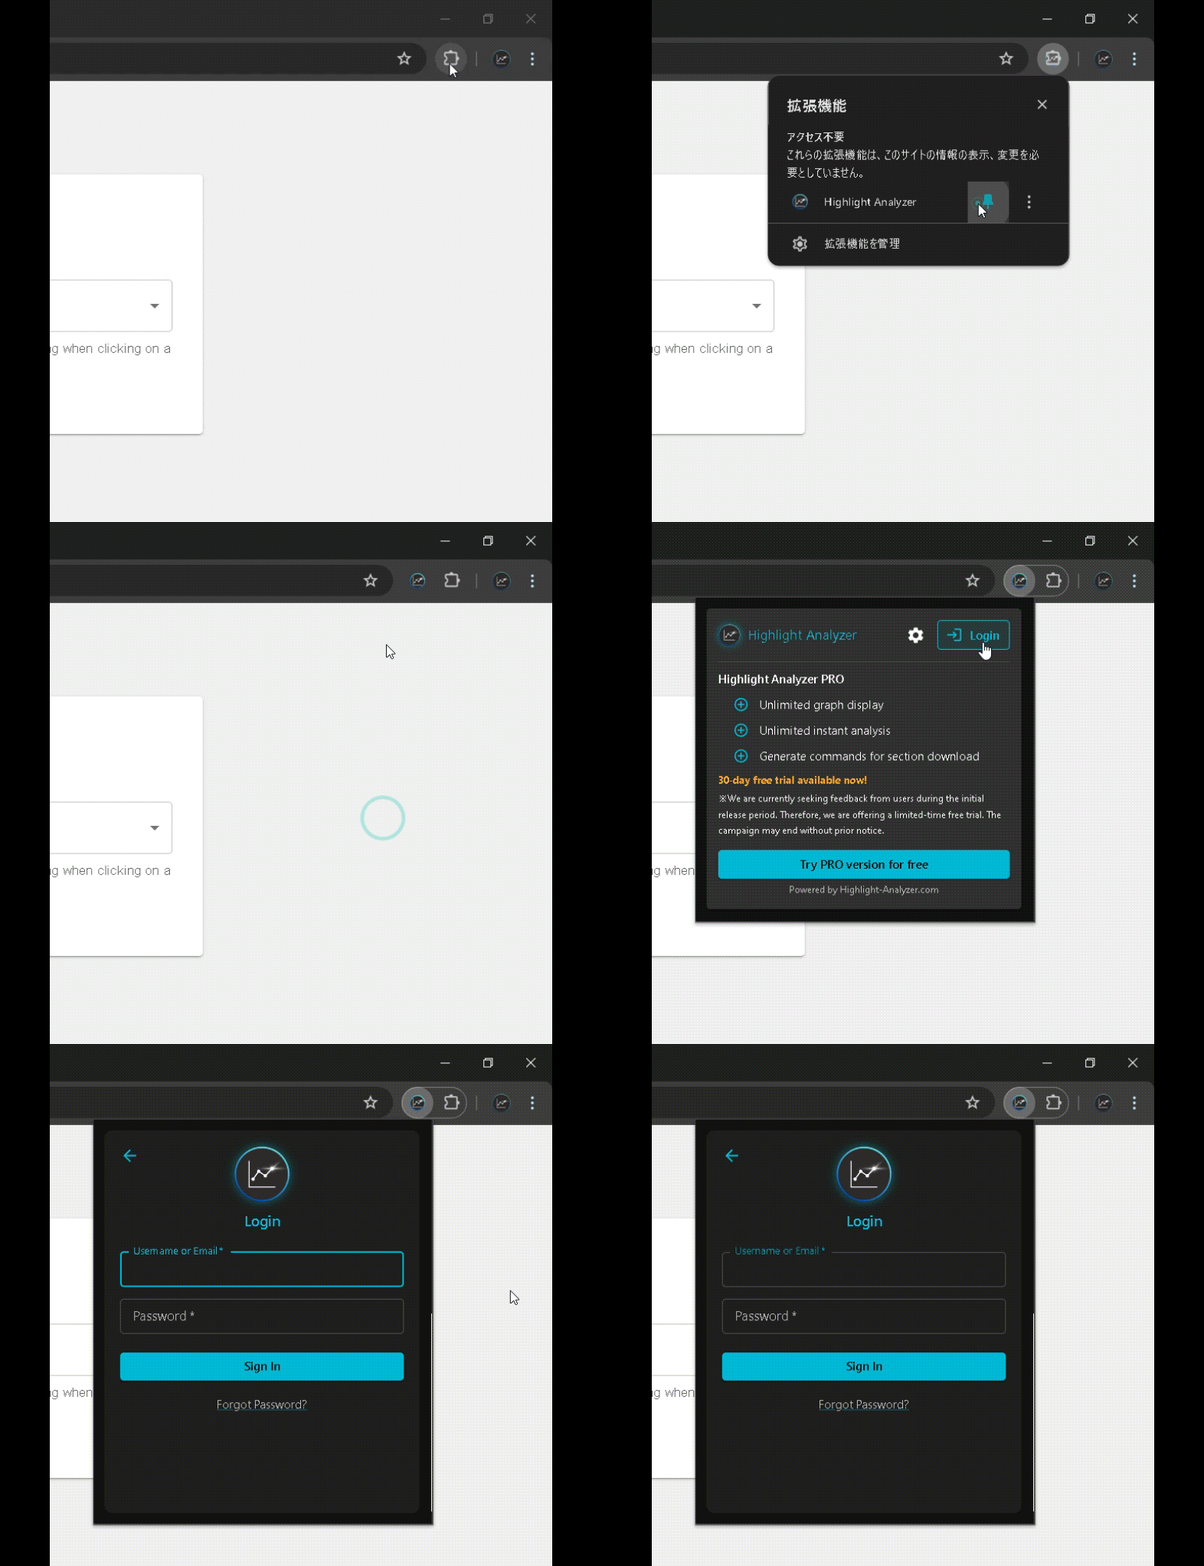
- インストール後、以下のGIFに示すように、拡張機能にログインしてください: After installation, please log in to the extension as shown in the GIF below:
yt-dlpインストールガイド yt-dlp Installation Guide
OSを選択してください Select Your OS
Windowsでのインストールの概要 Windows Installation Overview
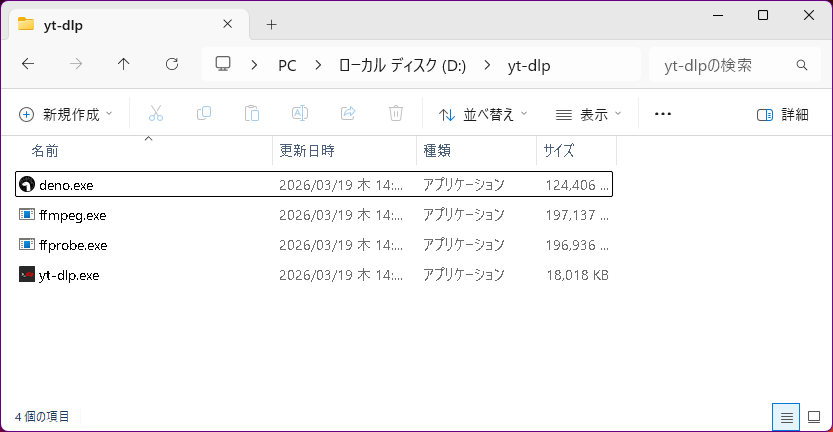
目標🚀 Goal 🚀
画像のようなフォルダの状態を作ること Create a folder that looks like the image below.
必要なファイル Required Files
yt-dlp.exedeno.exeffmpeg.exeffprobe.exe
ステップ 1: フォルダを用意する Step 1: Prepare a Folder
どこでもいいので、好きな場所に専用フォルダを1つ作成してください。
例: D:\yt-dlp
Create one dedicated folder anywhere you like.
Example: D:\yt-dlp
ステップ 2: 必要なファイルを配置する Step 2: Place the Required Files
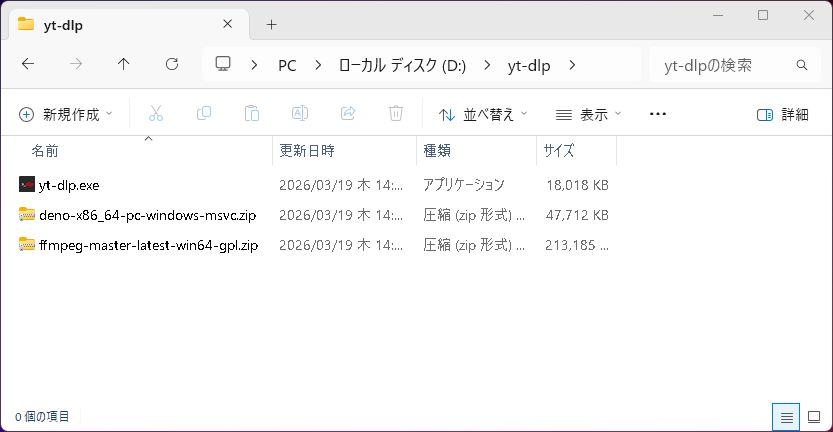
用意したフォルダ(例 D:\yt-dlp)にファイルをダウンロードして配置してください。
Download the files into the folder you prepared (for example, D:\yt-dlp).
-
yt-dlp.exe: 以下のリンクからダウンロードします。yt-dlp.exe: Download it from the link below.
https://github.com/yt-dlp/yt-dlp-nightly-builds/releases/latest/download/yt-dlp.exe -
ffmpeg.exe/ffprobe.exe: 以下のZIPをダウンロードします。ffmpeg.exe/ffprobe.exe: Download the ZIP below.
https://github.com/yt-dlp/FFmpeg-Builds/releases/download/latest/ffmpeg-master-latest-win64-gpl.zip -
deno.exe: 以下のZIPをダウンロードします。deno.exe: Download the ZIP below.
https://github.com/denoland/deno/releases/latest/download/deno-x86_64-pc-windows-msvc.zip
ステップ 3: ZIPファイルから必要なファイルを取り出す Step 3: Extract the Required Files from the ZIP Files
-
denoのZIPを展開し、展開後の中にあるdeno.exeを用意したフォルダに配置します。 Extract thedenoZIP file, then copydeno.exefrom the extracted contents into your prepared folder. -
ffmpegのZIPを展開し、展開後のbinフォルダからffmpeg.exeとffprobe.exeを取り出して、用意したフォルダに配置します。 Extract theffmpegZIP file, then copyffmpeg.exeandffprobe.exefrom the extractedbinfolder into your prepared folder. - 配置が終わったら、展開してできた不要なフォルダや、使い終わったZIPファイルは削除して構いません。 After copying the files, you can delete the extracted folders and ZIP files you no longer need.
以下の動画が、解凍して配置し、不要なフォルダやZIPを削除する手順の例です。 The video below shows an example of extracting the files, placing them in the folder, and deleting unneeded folders and ZIP files.
ステップ 4: そのフォルダでcmdを開く Step 4: Open cmd in That Folder
- エクスプローラーで、先ほどファイルを配置したフォルダを開きます。 Open the folder you prepared in File Explorer.
- そのフォルダのアドレスバーをクリックします。 Click the address bar for that folder.
-
cmdと入力して Enter キーを押します。 Typecmdand press Enter.
以下の動画が、実際の操作例です。 The video below shows the actual steps.
このcmdでそのままyt-dlpコマンドを実行できます。 You can run yt-dlp commands directly in this cmd window.
Highlight Analyzerからコマンドをコピーする手順 How to Copy Commands from Highlight Analyzer
- 設定 → 高度な設定 を開きます。 Open Settings → Advanced Settings.
- 「コマンドをUIに表示」にチェックを入れます。 Enable "Show command in UI".
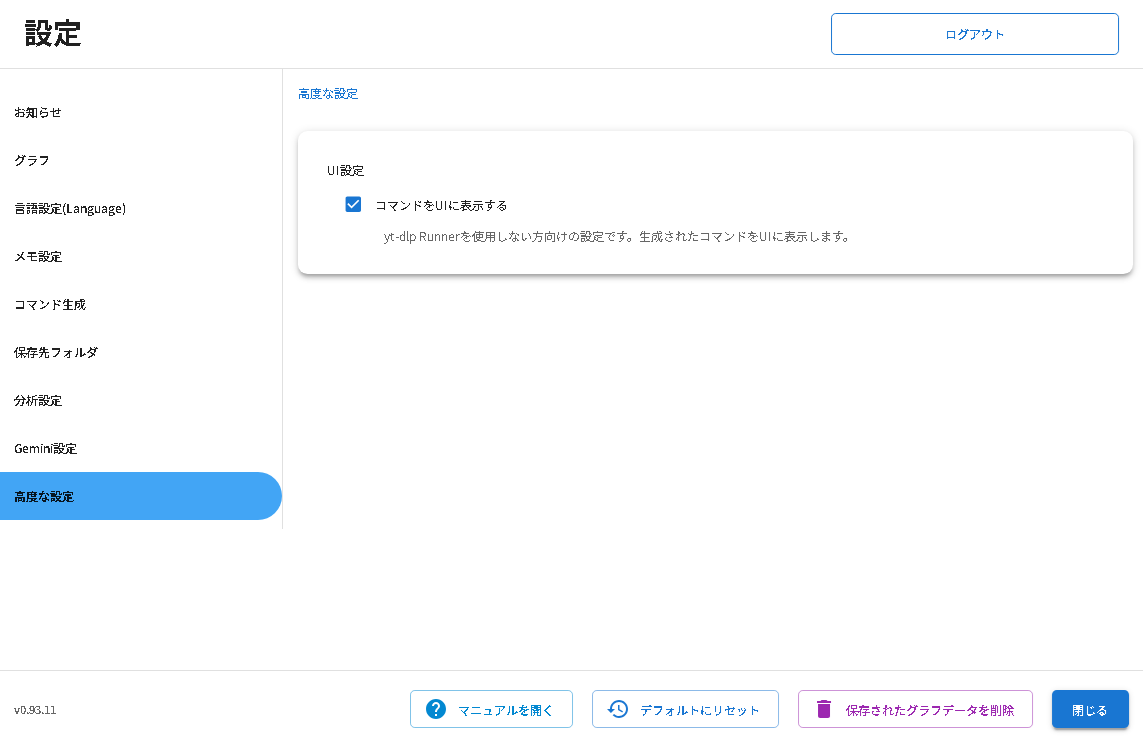
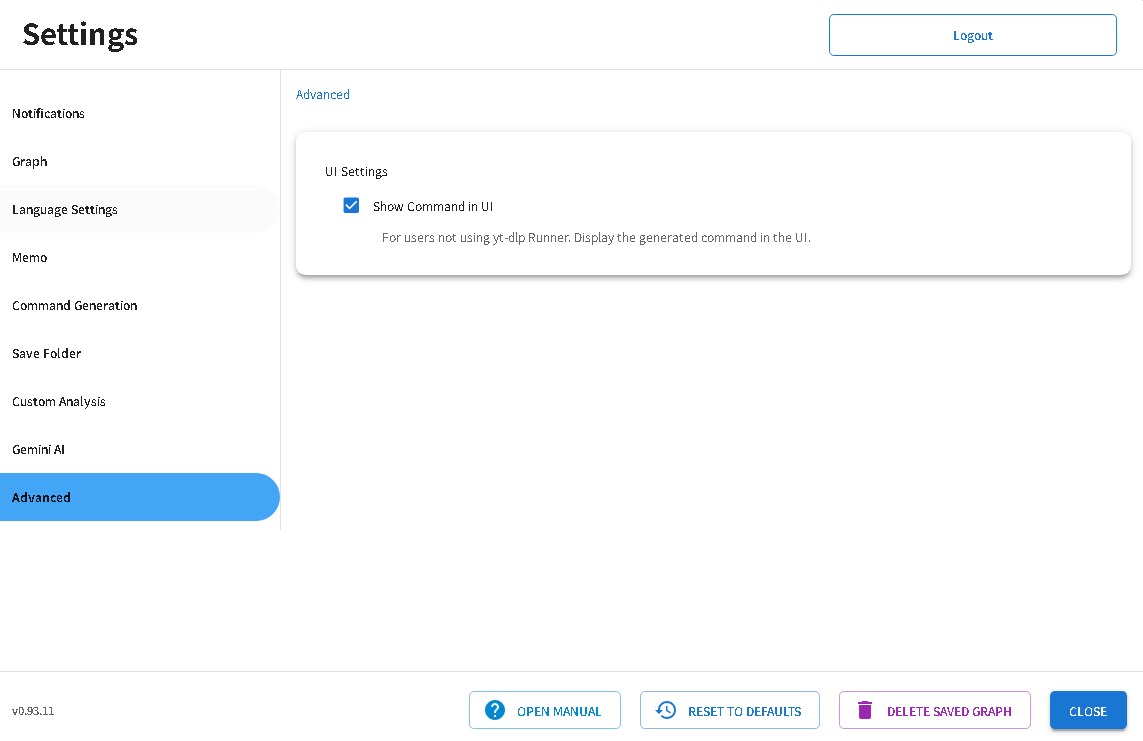
これで、UIにコピーボタン ⧉ が表示されるようになります。 This will make the copy button ⧉ appear in the UI.
コピーしてそのまま先ほどのcmdに貼り付けて実行してください。 Copy it, then paste it directly into the cmd window from the previous step and run it.
以上で Windows の準備は完了です。これで Highlight Analyzer Pro と併せて使用する準備が整いました。 Windows setup is now complete. You're ready to use it with Highlight Analyzer Pro.
macOS(Terminalでのコピー&ペースト) macOS (Copy & Paste in Terminal)
このガイドではTerminalにコマンドを貼り付けます。通常は Command+V が確実です。右クリックメニューが無効な場合でも Command+V は使えます。 You'll paste commands into Terminal. Command+V works reliably even if the right-click menu is disabled.
- Command + V:最も確実な貼り付け方法です。 Command + V: The most reliable way to paste.
- 右クリック(コンテキストメニュー):有効なら利用できますが、表示されない環境では Command+V を使ってください。 Right-click (context menu): Use it if available; otherwise use Command+V.
以降のすべてのコマンドで同じ方法を使って貼り付けてください。 Use the same method for every command below.
ステップ 1: Homebrewの確認とインストール Step 1: Check and Install Homebrew
まず、Homebrewがすでにインストールされているか確認します。 First, let's check if Homebrew is already installed.
- ターミナルを開きます。 Open Terminal.
- 以下のコマンドを入力してEnterキーを押します: Enter the following command and press Enter:
brew --versionバージョン番号が表示された場合、Homebrewはすでにインストールされています。ステップ2に進んでください。 If a version number is displayed, Homebrew is already installed. Please proceed to Step 2.
「command not found」というエラーが表示された場合、以下の手順でHomebrewをインストールします: If you see "command not found" error, follow these steps to install Homebrew:
- 以下のコマンドをコピーしてターミナルに貼り付け、Enterキーを押します: Copy the following command, paste it into Terminal, and press Enter:
/bin/bash -c "$(curl -fsSL https://raw.githubusercontent.com/Homebrew/install/HEAD/install.sh)"インストールが完了するまで待ちます。 Wait for the installation to complete.
インストール完了後の重要な設定 Important Post-Installation Setup
インストール完了時に表示される「Next steps」の指示に従って、PATHの設定を行う必要があります。 You need to configure the PATH settings according to the "Next steps" instructions shown after installation.
インストール完了時に以下のような指示が表示されます: After installation, you'll see instructions like this:
==> Next steps:
    - Run these two commands in your terminal to add Homebrew to your PATH:
        echo 'eval "$(/opt/homebrew/bin/brew shellenv)"' >> /Users/(username)/.zprofile
        eval "$(/opt/homebrew/bin/brew shellenv)"
    - Run brew help to get started
    - Further documentation:
        https://docs.brew.sh
このケースの場合、実行するコマンドは以下の2つです: In this case, you need to run these two commands:
- 1つ目のコマンド: First command:
echo 'eval "$(/opt/homebrew/bin/brew shellenv)"' >> /Users/(username)/.zprofile- 2つ目のコマンド: Second command:
eval "$(/opt/homebrew/bin/brew shellenv)"💡 ヒント 💡 Tips
- コマンドは必ず上から順番に実行してください。 Make sure to run the commands in order from top to bottom.
- ターミナルに表示されているコマンドには、既にあなたのユーザー名が反映されています。そのコマンドをそのままコピーして使用してください。 The commands shown in your Terminal already include your username. Copy and use those commands exactly as shown.
- ターミナルでのコマンドのコピーは、マウスで選択して Command+C を押してください。 To copy commands from Terminal, select the text with your mouse and press Command+C.
- 表示されるコマンドは環境によって異なる場合があります。必ずターミナルに表示された実際のコマンドをそのままコピーして使用してください。 The exact commands may vary depending on your environment. Always copy and use the actual commands shown in your Terminal.
ステップ 2: Denoのインストール Step 2: Install Deno
macOS版でも、最新のyt-dlpはDenoランタイムがないと動作しません。 On macOS, the latest yt-dlp also requires the Deno runtime.
GitHub issue #15012で周知された変更なので、yt-dlpを入れる前にDenoを準備します。 This change was announced in GitHub issue #15012, so set up Deno before installing yt-dlp.
- ターミナルを開きます。 Open Terminal.
- 以下のコマンドを入力してEnterキーを押します: Enter the following command and press Enter:
brew install denoインストールが終わるまで待ちます。 Wait for the installation to finish.
インストール後に、以下のコマンドでバージョンが表示されるか確認してください: Afterward, run the command below to make sure a version number is shown:
deno --versionバージョン情報が表示されればDenoの準備は完了です。 If the version information appears, Deno is ready.
Homebrewでインストールしておくと、今後はbrew upgrade denoで簡単に更新できます。
Installing via Homebrew lets you update later with brew upgrade deno.
Denoを入れていない場合、yt-dlpは起動時に警告を出し、YouTubeなどJavaScript処理が必要なサイトで失敗することがあります。インストール後にターミナルを開き直し、deno --versionが通る状態にしてください。
If Deno is not installed, yt-dlp warns at startup and downloads that rely on JavaScript (e.g., YouTube) can fail. After installing, reopen Terminal and make sure deno --version works.
ステップ 3: yt-dlpのインストール Step 3: Install yt-dlp
Homebrewを使用してyt-dlpをインストールします。 Install yt-dlp using Homebrew.
- ターミナルを開きます(既に開いている場合は新しいウィンドウを開く必要はありません)。 Open Terminal (if already open, no need to open a new window).
- 以下のコマンドを入力してEnterキーを押します: Enter the following command and press Enter:
brew install yt-dlpステップ 4: インストールの確認 Step 4: Verify Installation
yt-dlpが正しくインストールされたか確認します。 Verify that yt-dlp has been installed correctly.
- ターミナルで以下のコマンドを入力してEnterキーを押します: Enter the following command in Terminal and press Enter:
yt-dlp --versionバージョン(例:2024.07.09)が表示されれば、インストールは成功です。 If a version number (e.g., 2024.07.09) is displayed, the installation was successful.
ステップ 5: ffmpegのインストール Step 5: Install ffmpeg
yt-dlpの一部の機能には、ffmpegが必要です。以下の手順でffmpegをインストールします: Some features of yt-dlp require ffmpeg. Follow these steps to install ffmpeg:
- ターミナルで以下のコマンドを入力してEnterキーを押します: Enter the following command in Terminal and press Enter:
brew install ffmpegインストールが完了するまで待ちます。 Wait for the installation to complete.
ffmpegのインストールを確認するには、以下のコマンドを実行します: To verify the ffmpeg installation, run the following command:
ffmpeg -versionバージョン情報が表示されれば、ffmpegのインストールは成功です。 If version information is displayed, the ffmpeg installation was successful.
Highlight Analyzerからコマンドをコピーする手順 How to Copy Commands from Highlight Analyzer
- 設定 → 高度な設定 を開きます。 Open Settings → Advanced Settings.
- 「コマンドをUIに表示」にチェックを入れます。 Enable "Show command in UI".
これで、UIにコピーボタン ⧉ が表示されるようになります。 This will make the copy button ⧉ appear in the UI.
コピーしてそのままTerminalに貼り付けて実行してください。 Copy it, then paste it directly into Terminal and run it.
ここまでで、インストールは完了です。お疲れさまでした! All installations are complete. Great job!
これ以降は、Terminalでyt-dlpコマンドをそのまま打ち込んで実行すればダウンロードできます。 From here, simply type or paste your yt-dlp commands in Terminal and run them to download.
yt-dlpの使用方法 How to Use yt-dlp
yt-dlpのインストールが完了したら、Highlight Analyzer Proで生成されたコマンドを使用してビデオをダウンロードできます: After installing yt-dlp, you can download videos using commands generated by Highlight Analyzer Pro:
- ターミナルを開きます。 Open Terminal.
- Highlight Analyzer Proで生成されたyt-dlpコマンドをコピーします。 Copy the yt-dlp command generated by Highlight Analyzer Pro.
- ターミナルウィンドウ内で右クリックするか、Command+Vキーを押してコマンドを貼り付けます。 Right-click in the Terminal window or press Command+V to paste the command.
- Enterキーを押してコマンドを実行します。 Press Enter to run the command.
これにより、指定されたビデオがダウンロードされます。ダウンロードの進行状況がターミナルウィンドウに表示されます。 This will download the specified video. The download progress will be displayed in the Terminal window.
yt-dlpのアップデート(macOS) Update yt-dlp (macOS)
定期的に以下のコマンドを実行すると、Homebrew経由でyt-dlpを最新にできます。 Run the command below periodically to keep yt-dlp updated via Homebrew.
brew upgrade yt-dlp注意:保存フォルダの指定がない場合はデフォルトのダウンロードフォルダに保存されます。macOSのデフォルトのダウンロードフォルダは通常以下の場所にあります: Note: If no save folder is specified, files will be saved to the default downloads folder. The default macOS downloads folder is typically located at:
/Users/[ユーザー名]/Downloads[ユーザー名]の部分は、あなたのmacOSアカウントのユーザー名に置き換えてください。 Replace [ユーザー名] with your macOS account username.
トラブルシューティング Troubleshooting
インストール中に問題が発生した場合は、以下の手順を試してください: If you encounter any issues during installation, try the following steps:
- ターミナルで以下のコマンドを実行してHomebrewを更新します: Run the following command in Terminal to update Homebrew:
brew updatebrew install yt-dlpそれでも問題が解決しない場合は、コンピュータを再起動してから再度試してみてください。 If the problem persists, try restarting your computer and trying again.
以上でyt-dlpとffmpegのインストールは完了です。これでHighlight Analyzer Proと併せて使用する準備が整いました。 The installation of yt-dlp and ffmpeg is now complete. You're ready to use them with Highlight Analyzer Pro.
重要な注意事項 Important Notice
yt-dlpの使用に関して、以下の点に十分注意してください: Please pay careful attention to the following points regarding the use of yt-dlp:
- yt-dlpの使用は自己責任で行ってください。 Use yt-dlp at your own risk.
- 著作権法を遵守し、適切な権利処理を行ってください。著作権者の許可なく動画をダウンロードすることは違法となる可能性があります。 Comply with copyright laws and ensure proper rights management. Downloading videos without the copyright holder's permission may be illegal.
- 同時に、または短期間に大量の動画をダウンロードしないでください。 Do not download multiple videos simultaneously or a large number of videos in a short period.